It Started Out Just to Cover Up Some Dirt
We got a call from a family in Antigonish who were looking for one of our folding bench picnic tables. After we delivered it, the conversation turned into, “I was wondering if you can also do this…”. They wanted some sort of box to wrap around the deck posts columns to cover the dirt, and at the same time allow a shelf to place one or more social beverages while they sit out in their back yard.

Having a sawmill has its advantages, no need to buy lumber. So its been a while since I’ve been to the store for a few pieces of this and that. I think I know why they call it pressure treated lumber. Its because of the pressure that is treated to my wallet when purchasing. 3 pcs of 2x12x12ft and 14 pcs of 1x4x8ft came in at $213.00!

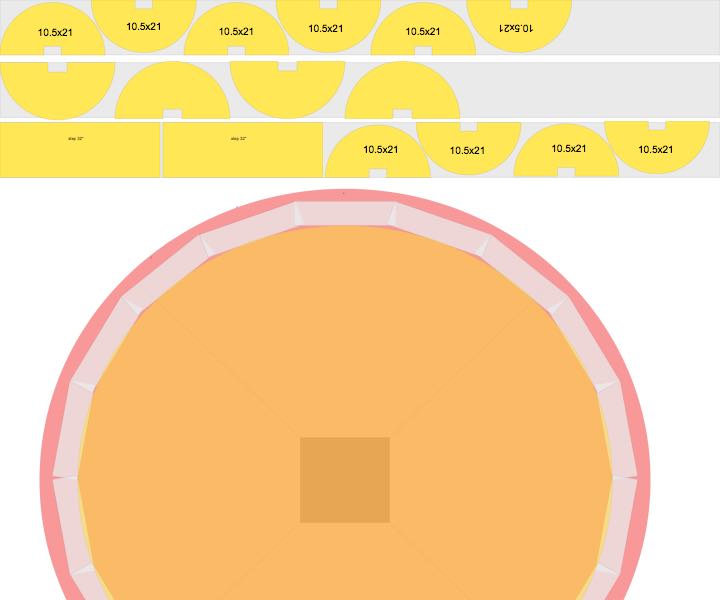
Actually I did know that the prices were going to be high so I had done some pre-planning. I laid out on the computer the round column model, then played with part sizes to make the best use of the lumber. This is a sample screen shot mid way through the process.

With the drawings finalized for minimal wastage, it was on to test cutting, which went very well and no surprises. Thankfully.

Next thing you know it was assembly time. Keeping the half barrel shapes square while evenly spacing the boards and accommodating for the doors that would also need to be cut away, was a test for sure.

We’re cruising along at this point, hiding the screws so that in the end we have a nice clean look to the pieces of outdoor furniture.

It was time to make the 24 inch diameter tops (and bottoms) but the 2×12 are only 11.25 inches wide. With a little bit of figuring, I drew up some half circles with a 1-3/4 inch offset to accommodate the 2×4 inch blocks that will be a part of the overall design. I used a nail and a framing square to draw out the chord of a half circle. You got all that?

With the parts complete it was time for some final sanding. Let’s take a minute to talk about shop safety. When cutting wood, generally speaking you should be wearing a dust mask of some sort. When it comes to pressure treated lumber though, its absolutely mandatory.
While we’re talking about “PT” lumber, don’t burn it. Indoors or even outdoors. Based on the reading that I have done on the older type PT lumber, the heat generated from fire releases the arsenic that is chemically bonded to the wood. The arsenic travels through the air attached to the smoke dust (just like saw dust). You do not what to be breathing in wood smoke that has arsenic in it. The newer treated wood now on the market have less dangerous chemicals, but none the less, take the appropriate precautions. The CWC.ca web site has good information. Dispose of the wood scraps in a responsible manner.
End rant.

We have reached the conclusion of this building project. I think they turned out pretty good.

The square hole in the top will accommodate the post at the customers home, wrapping around and hiding the hole in the ground. When I get to the location I will have to back out a few screws so each column cover will be in two pieces. Then once they are in place around the square post, they will get screwed back together to form a circle.

Did I mention that they wanted two made?

With the columns built we headed out to install them. We just had to back out a few screws, put them in place, and screw them back together. In case you can’t picture it here you go…

Contact us for your custom woodworking needs! Nothing is too big or too small, we do it all! All except twisty tables…have to draw the line somewhere folks.
Later


